
How to Create a User Flow Diagram
When done right, we love a good user flow diagram.
Similar to roadmaps, these visuals are essential tools for understanding how users interact with your product or service — and then taking what you’ve learned and optimizing your product to better fit their needs.
In this guide, we'll dive into the what, why, and how of user flow diagrams so you can get familiar with making them effectively.
What is a user flow?
A user flow illustrates a sequence of steps a user takes to accomplish a specific task within an app or a service. Visually, it’ll represent user interactions, decision points, and the overall journey from start to finish.
The goal is to design a flow that feels almost invisible to the user and allows them to pass through quickly and without friction, no matter who they are or what their situation might be.
Having this visual map is a great tool to have on hand as it helps UX designers and developers better empathize with the user, predict potential issues, and create a more seamless and intuitive experience.
Today we’ll go over the key concepts behind user flow diagrams. To clarify the concepts, we’ll be using a simple login flow as an example so you can get familiar with what a real-life user flow looks like in action.
We'll dissect this common task and illustrate the user flow from the initial encounter with the login screen, to the final steps where the user lands on a list view or a gallery view after successfully logging in.
By the end of this blog post, you’ll have a clear understanding of what user flow diagrams are, what makes them so valuable, and how they fit into the UX process.
1. Understand who your user is
Before you begin sketching out any user flow diagrams, you need to step into the shoes of your users.
Knowing who they are, what they need, and how they might think can make the difference between a just adequate user flow and an A+ one.
This understanding will inform how you design each interaction point, especially for critical processes like authentication, which can set the tone for the user's entire experience with your app.
Who is the user in this scenario?
To create an effective user flow for authentication, you first need to understand who will be using your app. Users can vary widely in their familiarity and objectives.
For example, they could be someone returning to your app who needs to log in quickly to access their information. Or, they might be a new user who's still getting acquainted with your platform.
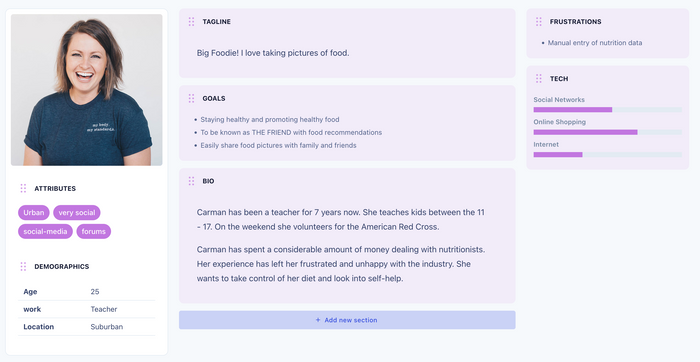
Tip: If you’re unsure of which user you’re targeting for this particular user flow, you can create personas representing these different users to help you better understand which direction to take.In this case, let’s say our user flow authentication is targeting a returning user.
What are your users’ goals?
Another important way to help you narrow the type of user you’re targeting for your authentication process is to identify the primary goals or tasks that these users want to accomplish.
Understanding user intentions will guide the structure of your user flow diagram.
With the authentication process, for example, the end goal is clear: secure access to the app’s features.
In the case of designing this particular authentication user flow, you'd begin by identifying the starting point — the login screen.
Our returning user's goal here is to gain access to their account securely and quickly, which would mean a straightforward login process.
Our user flow would ideally detail the steps involved, such as entering their username and password that they’ve created before, dealing with possible errors, and finally reaching the content of their choice.
2. Define your entry point(s)
Great, now you know who your user is and why you’re creating a user flow for them. Now what?
First, you’ll want to determine the various entry points users may use to access your product or service, such as website landing pages, app stores, or referral links, to understand where users first encounter your product.
Since your users are using an app, you can set the start of the user flow as soon as they click on the app and enter the login screen page.
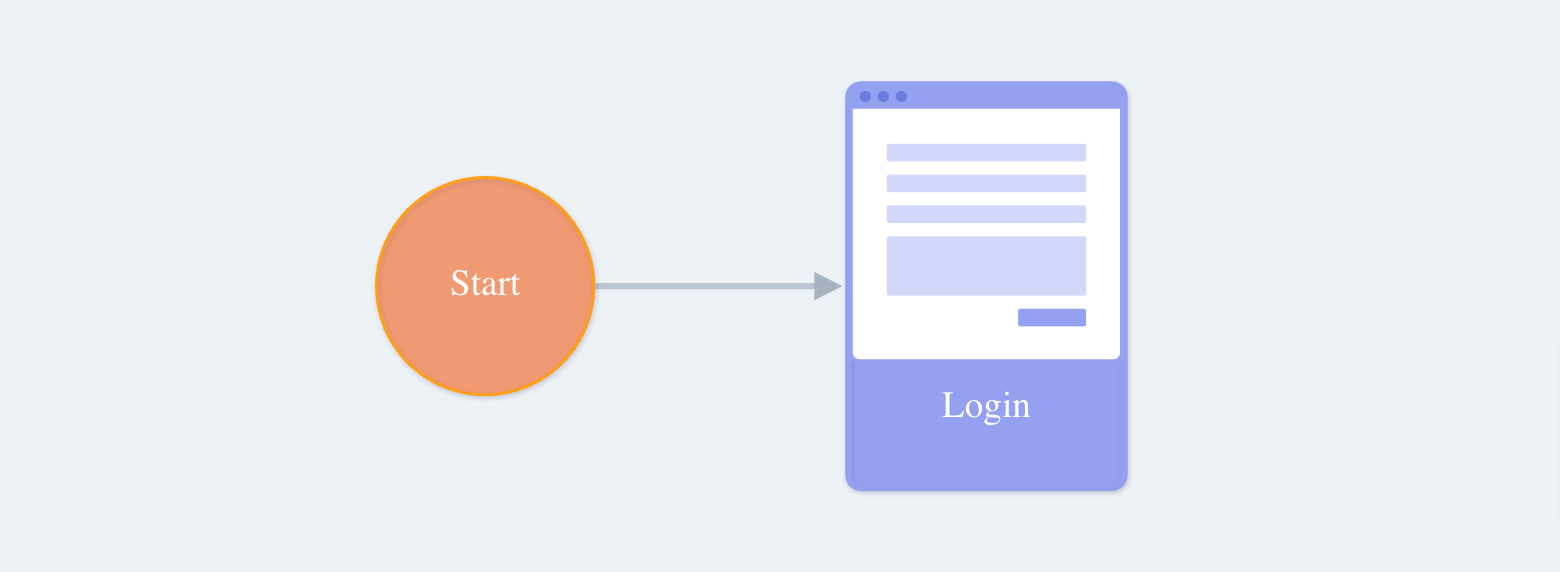
Circles in user flows typically symbolize start and end points, so you can draw them out on paper or by using UserBit's user flow tool.
For this specific authentication flow, you’ll need a Login page. Use a screen node and make sure to label it as “Login” so your diagram is clear from the beginning.
3. Map out your users’ actions and determine alternate paths
Just like any project, a good execution requires great planning.
Creating a successful user flow diagram will not only require thinking through the various actions that a user can take to achieve their goal, but also anticipating how the system reacts to their actions.
As we mentioned earlier, think in the shoes of your user by imagining your target user is trying to access their account.
You need to determine the necessary actions for a successful login and what alternatives might be in place if a user encounters an issue.
Not all users will follow the same path, so it’s important to consider and map out alternative pathways they may take.
Let’s start from the basics: the user starts at the login screen, where they’ll enter their username and password.
Now, it’s time to map out the possible outcomes:
Successful login: If the user correctly enters their details, the system will authenticate them, leading to a decision on user preference — they can choose either a list view or a gallery view to proceed with.
Failed login: If the login fails, perhaps due to a forgotten password or username, the flow should direct the user to try again, potentially offering a password reset or hint.
These two scenarios form the branching paths of our diagram. By representing each process with labeled, color-coded, rectangles (or other shapes relevant to you or your team’s diagramming language), you’ll be able to effectively visualize the user's journey.
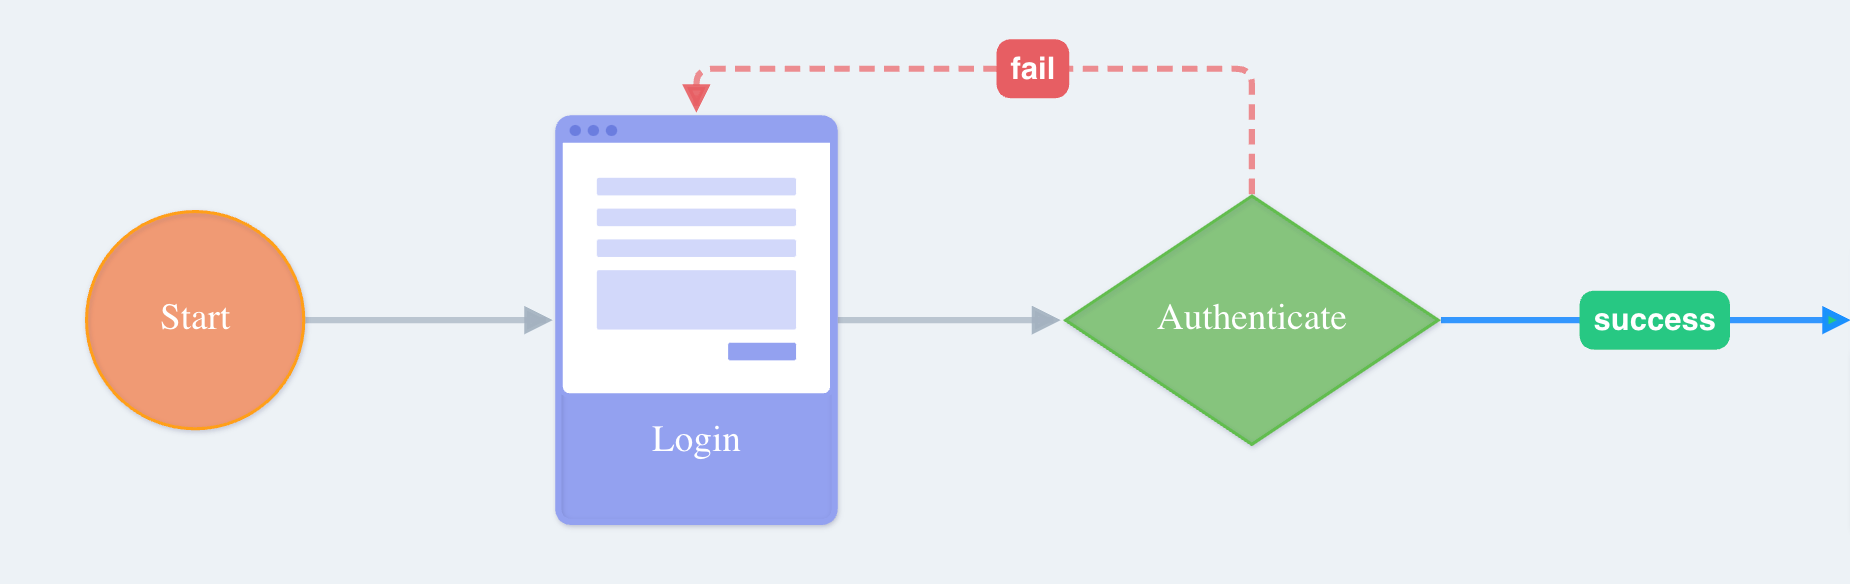
In this user flow, let’s label our paths as “Success” and “Fail.”
4. Identify decision points
When mapping out user actions, don’t forget to consider the decision points, which are often represented by diamonds.
These are critical sections where a user must make a choice or the system performs a check, like the authentication check in your flow.
From our simple authentication diagram, once the user inputs their credentials at the login screen, they reach a critical decision point represented by a diamond, where the system authenticates their login details and determines whether the authentication is successful or fails.
5. Add feedback loops
Let’s say your user failed to login. Uh oh! What’s next? The answer is to add feedback loops.
A feedback loop is a part of the user flow where users revisit steps to complete an action successfully.
Your user flow should always account for feedback loops where the user may need to repeat certain actions based on specific outcomes.
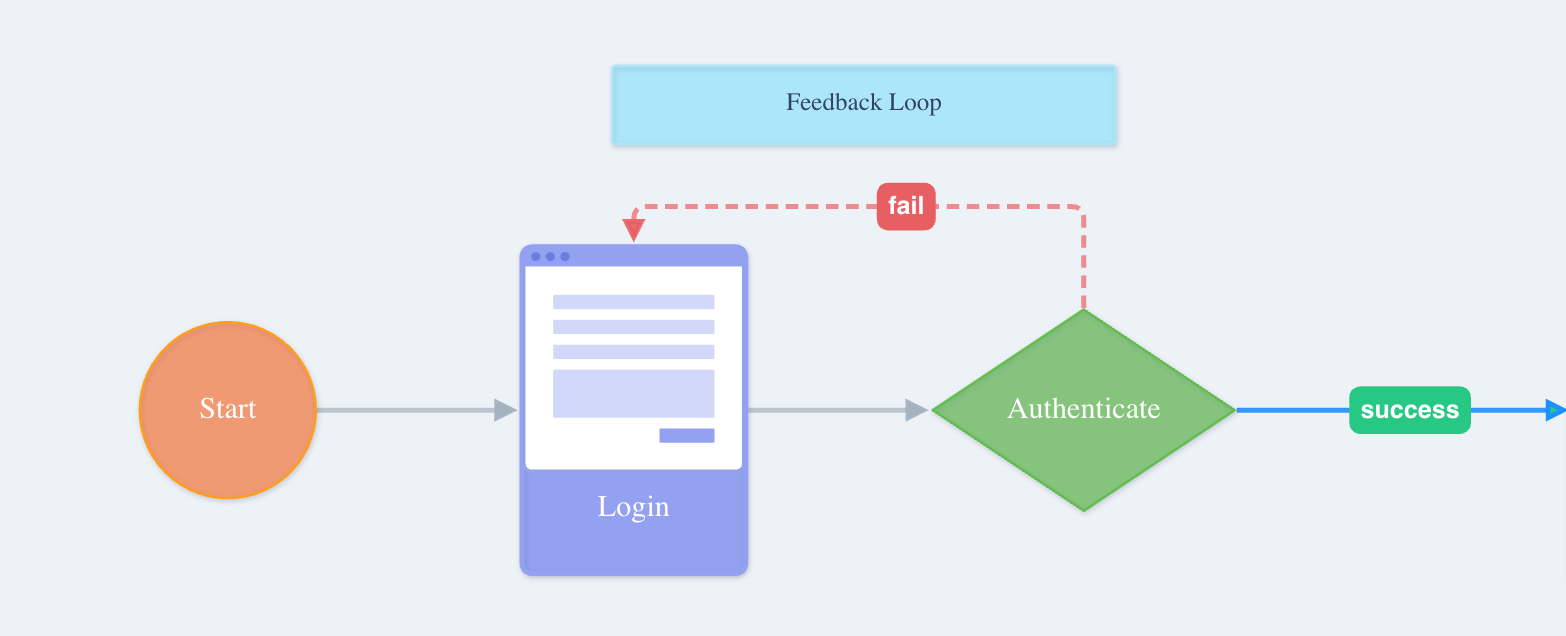
Let’s move back to our example. In the diagram, if the user fails to authenticate, they’re prompted to go back to the login page, which is an example of a feedback loop.
To send the user back for a retry, you could ask them to recover their password or retry the login.
Adding feedback loops like this enhances user satisfaction by offering clear solutions to problems and reduces the likelihood of users giving up out of frustration.
You can also include a text box with an explanation in case your team member or stakeholder wants to understand the logic behind your user’s journey.
6. Incorporate system interactions and visual elements
Remember to add every interaction between the user and the system to your diagram. These are important even if they don’t involve a decision by the user.
Make sure to turn each and every step into a visual element of your user flow diagram. Use circles to show where the user starts and finishes, rectangles to show the actions they take or screens they see, and diamonds to show where they have to make choices.
Also, dotted lines represent optional paths or conditional actions, while solid lines signify essential user actions or straightforward paths.
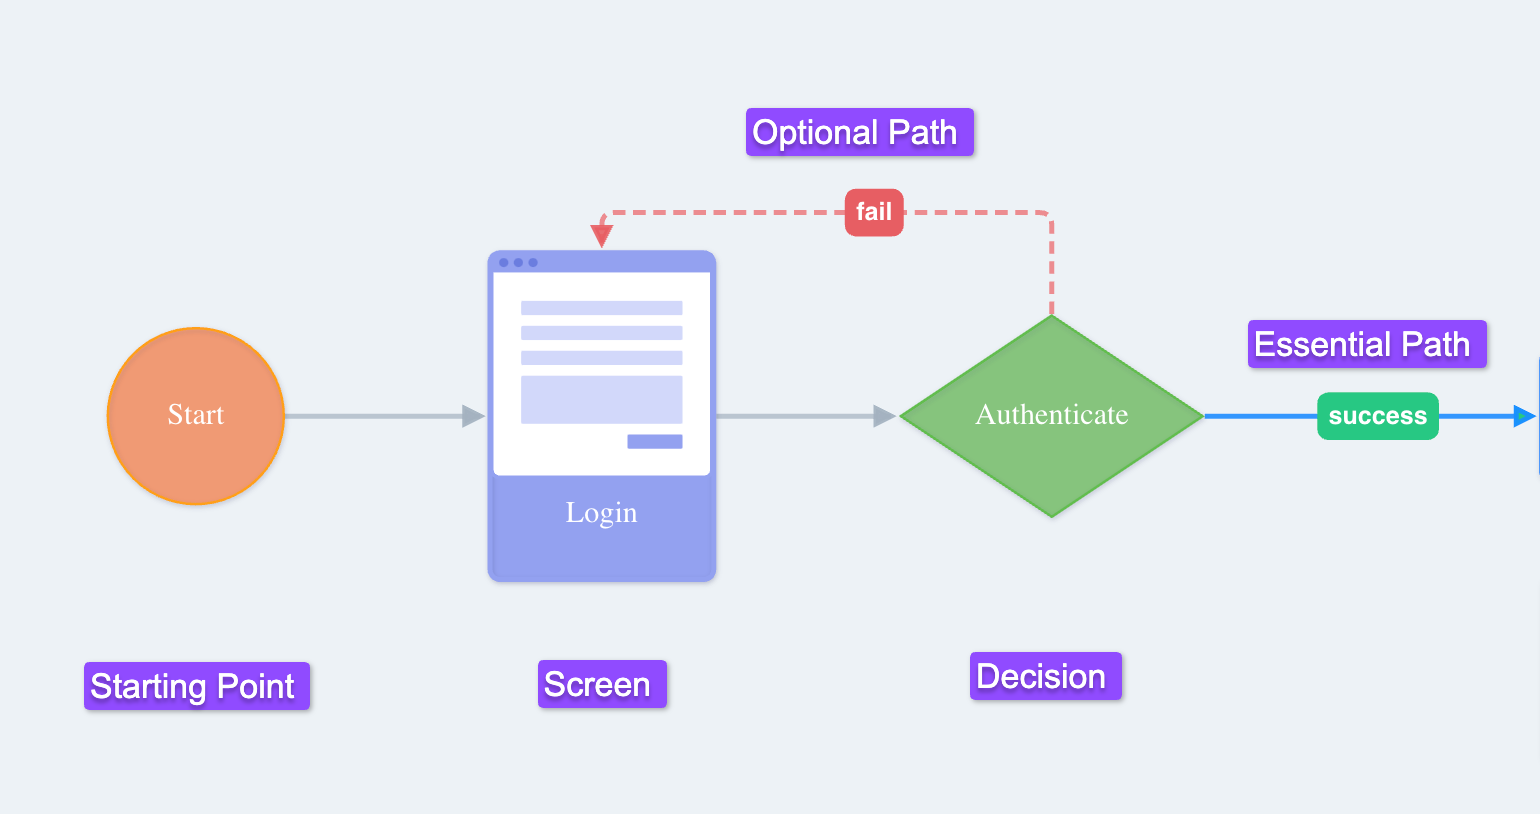
For instance, use dotted lines to show actions they might not always take, like if they fail to log in and need to reset their password. Solid lines show the actions they will definitely take, like entering their username and password.
Connect these elements with arrows to illustrate the flow of user actions. Labels are your friends here — use them to make each step crystal clear.
As you build out your diagram, take advantage of the variety of screen node types available to you.
Screen nodes represent the various user interface (UI) screens that a user might encounter within a digital service or application. These nodes are visual symbols within a user flow diagram that correspond to different types of content a user will interact with.
Screen nodes are helpful because they:
- let designers and stakeholders see at a glance the different types of interactions a user will have
- make it easier to discuss and plan the layout and flow of an app or service by providing a clear, organized way to represent the user's journey from screen to screen
- ensure that each step of the user experience is accounted for and that the transitions between different screens are logical and intuitive
Within UserBit's platform, a variety of screen node types can be used to accurately depict various stages and interfaces users may encounter.

For instance, you might use a “Page” node to represent a full screen of content, a “Modal” for pop-up messages or actions, a “Gallery” to depict a selection of images or products, and “List” nodes to show items or options.
For our purposes, we're using the "Login" node specifically to illustrate the initial user interaction point, which is essential because it marks the beginning of the user's journey and is a critical step in gaining access to the service.
7. Identify your user’s endpoints
Now, define clear and measurable endpoints. Endpoints in a user flow are the goals your users are trying to achieve — specifically where their journey is complete after they’ve successfully navigated through the app.
In our case, the endpoints are particularly significant because they represent the successful outcome of logging in.
These endpoints could include actions like completing a purchase, submitting a form, or accessing specific content.
Remember our end goal? It was to have our user successfully login to the app and be able to choose from viewing their content in a list and gallery format.
For our authentication flow, the endpoints are the list and gallery views, capped with a “Done” symbol.
8. Test and validate the flow
Once your diagram is complete, you should always test the flow to ensure it's logical and meets the users’ needs.
Try it yourself! Walk through the flow as if you were a user and check for any points of confusion or friction.
Getting feedback from others, especially those who resemble your target users, can also be a good way to gauge if your user flow makes sense.
9. Update and share your diagram
A user flow diagram isn’t set in stone.
As your product evolves and you gain more insights about your users, you’ll need to keep your diagram up-to-date so it reflects the current user experience and continues to be a useful tool for your team.
Remember, a user flow diagram is a tool to visualize the user's journey, but it also needs to be a functional guide for design and development decisions.
Once you've finalized your user flow diagram, document it for future reference and sharing. Save your diagram in a format that's easily accessible to team members and stakeholders, whether it's a digital file or a printed document.
Tip: Consider creating a legend or key to accompany the diagram that explains the meaning of each symbol and element.With UserBit’s Discovery Portal, you can easily share your flow diagrams for your stakeholders and team members to view and explore.
Your stakeholders or clients who have access to the portal, will be able to click directly into your user flow diagram to see the details of it and the nodes you’ve included.
And there you have it! Good luck with your future projects, and hope our guide helps you drive more meaningful improvements to your product and for your users!
